
Page 3 - Scholastic EasyScan®2 Quick Start Guide
P. 3
Getting Connected
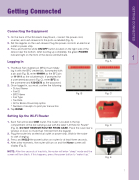
Connecting the Equipment
1. On the back of the Scholastic EasyScan2, connect the power cord, scanner, and cash drawer into the ports as labeled (Fig. A).
2. Set the register on the cash drawer. Plug the power cord into an electrical outlet or power strip.
3. Press and hold the white ON/OFF button located on the right side of the device near the bottom. After booting up completely, the green POWER indicator light on the front of the device will illuminate.
Logging In
1. The Book Fair chairperson (BFC) must initially log in with the BFC credentials. If prompted with a pin pad (Fig. B), enter 999999 as the BFC pin or 111111 as the volunteer pin. If prompted for a username/password (Fig. C), enter BFC as the username and 12345678 as the password.
2. Once logged in, you must con rm the following:
• School Name
• Fair ID
• BFC Name
• Fair Type
• Tax Rate
• All for Books Round Up option
• Number of receipts to print per transaction
3. Tap DONE.
Setting Up the Wi-Fi Router
Fig. A
1. Each Fair will receive ONE router. The router is located in the top compartment of the red carrying case with the label “Lift Here for Router” (Fig. D). DO NOT REMOVE ROUTER FROM CASE. Place the case near a window or door, no more than 100 feet from the register.
2. Plug the router into an electrical outlet or power strip. Wait for the router to start charging.
3. Press and HOLD the power button on router for at least three seconds.
4. After a few moments, the router will turn on and the Home screen will
display (Fig. E).
NOTE: After ve seconds of inactivity, the router will enter “sleep” mode and the screen will turn black. If this happens, press the power button to “wake it up.”
Fig. D
Fig. B
Fig. C
Fig. E
1
1
GETTING CONNECTED
